Let us help you!
2. Editing Html files
Starting
Once you have chosen your color scheme and the best layout to begin your newsletter, remember not to edit the original files and to make a copy to work on it.
Editing
We really, really hope you find the HTML files easy to use, so we have made some comments (text that is ignored by the program) between the code in order to make obvious what is it about. Look for the string <!-- in the source code.
By the way, if you want to edit the code to compose your newsletter, you are going to need to use the comments. Between <!-- PANEL begins -- > and <!-- PANEL ends -- > you'll find different modules that you can exchange, switch, erase, duplicate, without shame.
							<!-- PANEL begins -->
							<table align="left" cellpadding="0" cellspacing="0" border="0" style="table-layout: fixed;">
								<tr>
									<td width="50" height="16" bgcolor="#003399" style="border-bottom: 1px solid #555555;">
										<span style="font-size: 9px; line-height: 16px; color: #FEFFDF; text-transform: uppercase;">dec</span>
									</td>
								</tr>
								<tr>
									<td width="50" height="34" bgcolor="#FEFBE9" style="border-top: 1px solid #FFFFFF;">
										<span style="font-size: 23px; line-height: 34px; color: #333333;">19</span>
									</td>
								</tr>
							</table>
							<!-- PANEL ends -->
But, watch out! be nice with the content within those modules. You can break something!
NOTE: Not every HTML editor will have the same colors shown above.
Image resizing
When you change the logo image, and we suppose you'll do it, you have to:
- Replace the JPG image in the folder.
- Change the width and height properties in the tag if the new image is different.
<img src="images/logo.jpg" width="228" height="50" border="0" alt="Your Brand">
This tip applies to any picture!
NOTE: Remember to update the call to the image if your logo is named differently from the original one, which is logo.jpg, or just name it like this!
Important: Do not touch anything if you are not sure about its consequences! There are a lot of mail clients out there waiting for a mistake to shatter your newsletter!
3. Editing PSD files
What's in?
If you use Photoshop to edit your images, you will find 2 PSD files per theme:
- images.psd: in this file you'll get interface elements such as backgrounds, borders, icons, buttons, titles, etc.
- photos.psd: this file contains sample pictures used in the template. You can dispense with it.
Editing
If you want to change any text in the images.psd file, such as like titles and button texts, feel free to play around with them: they are completely editable!
Now, there are a lot of images you don't want, they are unnecessary and they weigh, so remove all the images in the image folders. You will export only images you need.
Plus, you have to erase or hide unneeded layers before exporting, or just delete the unwanted slices.
NOTE: You may need to install the Lobster and Lobster Two fonts in order to edit the titles in the file. See the credit information below to download the fonts.
NOTE: You are going to note some little differences between Photoshop and Fireworks exported images, but that's something expectable. It's not a big deal anyway.
Exporting
After editing and deleting, you may want to export the resulting images. Go to File › Save for Web (or corresponding) or press Alt+Shift+Ctrl+S, make the adjustment and proceed.
Select the correct folder. It's easy:
- Locate the corresponding color theme. Let's say you like the green one with the colored background.
- Choose images folder if you are in images.psd file.
- Choose photos folder if you are in photos.psd file.
It will be something like this: Green/Colored_bg/HTML/images/.
Important: Don't forget to select All User Slices option before saving! You don't want to export extra images, right?
NOTE: Don't change slice names except you know what you're doing!
4. Editing PNG files
What's in?
Probably you will prefer to use Fireworks instead of Photoshop to edit your images, then you will find 2 PNG files in the selected theme:
- images.png: in this file you'll get interface elements such as backgrounds, borders, icons, buttons, titles, etc.
- photos.png: this file contains sample pictures used in the template. You can dispense with it.
Editing
If you want to change any text in the images.png file, like titles and button texts, feel free to play around with them: they are completely editable!
Now, there are a lot of images you don't want, they are unnecessary and they weigh, so remove all the images in the image folders. You will export only images you need.
Plus, you have to erase or hide unneeded layers before exporting, or just delete the unwanted slices.
NOTE: You may need to install the Lobster and Lobster Two fonts in order to edit the titles in the file. See the credit information below to download the fonts.
NOTE: You are going to note some little differences between Fireworks and Photoshop exported images, but that's something expectable. Tomato, tomahto...
Exporting
After editing and deleting, you may want to export the resulting images. Go to File › Export (or corresponding) or press Ctrl+Shift+R, make the adjustment and proceed.
Select the correct folder. It's easy:
- Locate the corresponding color theme. Let's say you like the green one with the colored background.
- Choose images folder if you are in images.png file.
- Choose photos folder if you are in photos.png file.
It will be something like this: Green/Colored_bg/HTML/images/.
Important: Don't forget to select Images Only option and to uncheck Include areas without slices box before saving! You don't want to export extra files, right?
NOTE: Don't change slice names except you know what you're doing!
5. Let's send the newsletter!
Get the program!
Let's say you don't have any software to send emails, then you have to install one: try Thunderbird, it's free! Ask your little brother for help.
Path replacement
Before editing your email you have to be sure to replace the path of the images from images/ to file://localhost/C:/Campaign/images/ (or corresponding) in the HTML file. You have to do the same with the photos/ path.
You will go from this:
<img src="images/btn.jpg" width="130" height="40" border="0" alt="Can't wait!">
To something like this:
<img src="file://localhost/C:/Campaign/images/btn.jpg" width="130" height="40" border="0" alt="Can't wait!">
NOTE: You must know that sending images by email may cause that mail clients block them, for that reason it is said to be much safer to store your images in a remote server. Then, you'll replace images/ with http://www.domain.com/campaign/images/ and so on.
Copy and paste
Open Thunderbird, compose a new message by clicking on Write button, choose Insert › HTML on the menu, copy the code from your HTML editor, paste it into the little window and accept. You have to be able to see your newsletter ready to send.
Edition
You can edit any text you want but beware of typing too much, 'cause you can upset the layout balance!
NOTE: We mean it. Try to replace similar blocks of text.
6. Use it in MailChimp!
Let the monkey work for you!
If you are going to use the chimp to send this newsletter, just dismiss the item above.
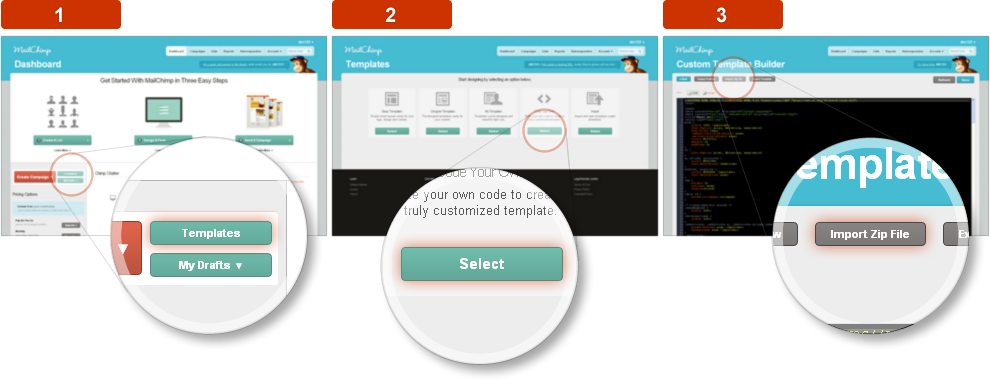
The easiest way to use MailChimp once you have the email ready to send is zip it and upload it. Be sure to zip your HTML file including your image folders, then log in at MailChimp and follow the next steps:
- Staring in your dashboard, click on Templates.
- Choose the Code Your Own option.
- Press Import Zip File button.
Now you can follow the monkey's steps.
NOTE: If you are an Opera lover, you should think of use another browser to make this task. Opera may not fully support inline HTML editing tools, so it's not recommend.
7. Credits and sources
Thank them!
- Lobster and Lobster Two. License details: «This Font Software is licensed under the SIL Open Font License, Version 1.1».
- Tourism pictures. License details: «These icons are free to use. Please give a link to our website when use them in public. Thanks!».
- Crazy circles. License details: «The source files are made available download can be used within commercial and non commercial design projects. You may may not redistribute files featured on vector patterns or hot link to files featured on Vector Patterns. Any further question which you may have regarding licences details about freebies released on Vector Patterns your more than welcome to get in touch with us».
- JustVector Social Icons 1.5. License details: «The icons are distributed under the Free Art License, and as such can be copied, distributed, transformed and used as you please. If you enjoy the icons, a link back to this page would certainly be appreciated. And if you use the icons on your site, feel free to let me know so I can link to you!». Note: the company logos in the icons are copyright of their respective owners.
- PIO0049.jpg, PIO0051.jpg and PIO0052.jpg. License details: «morgueFile free photo. You are allowed to copy, distribute, transmit the work and to adapt the work. Attribution is not required. You are prohibited from using this work in a stand alone manner».